Did you know that you could program your
micro:bit board
with only a mobile (and some 4G network)? For those who don’t know micro:bit, it is a single board computer (like Raspberry Pi or Arduino) launched by the BBC in 2015.
Since then, this credit card sized nano-computer has conquered the world of education in England, but also in the rest of Europe.
Micro:bit doesn’t cost much (19,90€ inc. tax), even compared to the Arduino and Raspberry Pi boards.
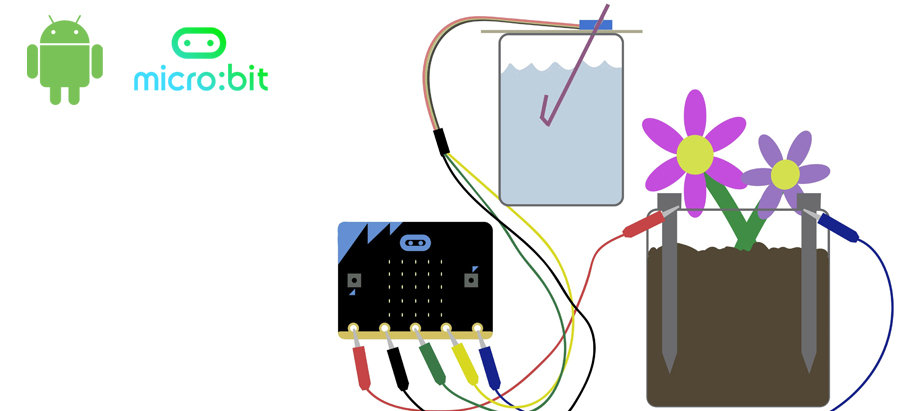
Micro:bit features a lot of sensors (especially given its size!)
- 2 x Microcontroller
- 1 x Bluetooth chip
- 1 x Digital compass
- 1 x Accelerometer / Gyroscope
- 1 x Temperature sensor
- 1 x USB host
- 1 x Connector for battery
- 2 x Programmable A and B buttons
- 1 x 5×5 Matrix with 25 individually programmable LEDs
- 5 x Inputs & Outputs (Digital & Analog)
- 20 x Connecting pins (GPIO pins)
Micro:bit is very small. It is the size of a credit card and only 2 mm thick (6mm if the A & B buttons are included).
A wide range of compatible accessories have been developed by other manufacturers like Seeed Studio, Elecfreaks or Kitronic. Micro:bit is also compatible with the Raspberry Pi camera module .
There is a highly engaged user community around micro:bit and a wide range of online resources to help you getting started (guides, tutorials, projects).
You can program your micro:bit from a computer, a mobile, or a tablet. Just follow this blogpost’s instructions to learn how to code from a smartphone.
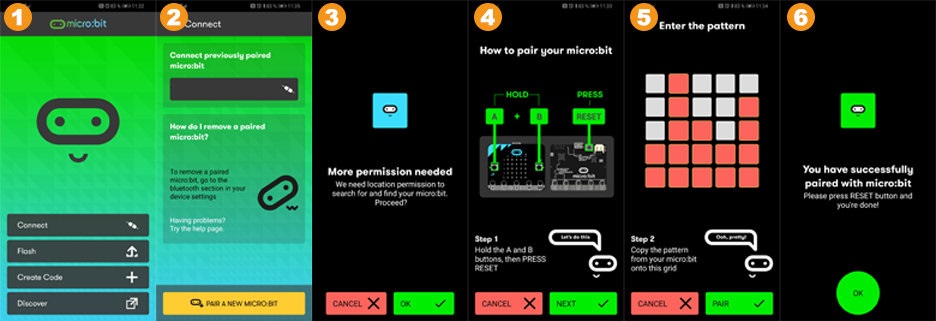
Step 1: download the micro:bit app to your device (mobile or tablet)
The micro:bit app is compatible with both Android and iOS devices:
Step 2: pair your micro:bit board with your app
Micro:bit runs on 3.3V (with a battery) and 5V (with USB). If the board is properly powered, the LED on the micro:bit matrix will begin to flash.
You have to enable your smartphone or tablet Bluetooth.
- Open the micro:bit app and tap on the “Connect” button
- Tap on “Pair a new micro:bit”
- The app may ask permission to access some of your smartphone features
- To pair yout device with the micro:bit, press and hold down both buttons A and B and press the Reset button at the same time. Hold down the reset button for 2 or 3 seconds and then release it. Then release the A and B buttons.
- A pattern will appear on the micro:bit LED matrix. Draw the exact same pattern on the app’s screen.
- To finish the pairing process, press the Reset button.
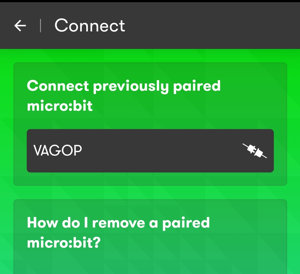
The app will assign an ID to your micro:bit board, our board’s ID is VAGOP:
Step 3: create a program
The best way to check if you have successfully paired your board with your smartphone is to test the temperature sensor.
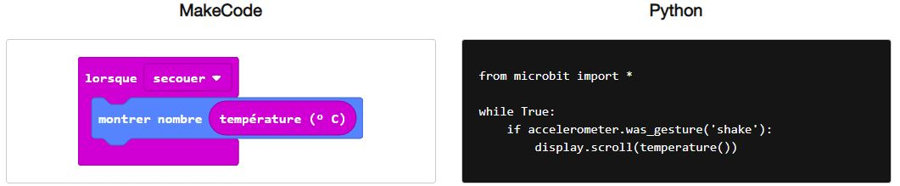
Nothing is easier than creating a micro:bit program on Android! Go to the micro:bit main interface and click on « Create code ». The micro:bit website will pop up on your screen, from there, just simply choose your programming language.
Choose the visual editor MakeCode (or the MicroPython editor) and enter the code above (you can switch between languages easily, just click on the « Settings » icon (English is the default language).
Click on the purple icon on the lower right side of the screen to download the .hex file to your device.
Step 4: transfer a file to the micro:bit board

Get back to the micro:bit app’s main page and select « Flash ». Choose a .hex file to flash.
You will find a list of files on the micro:bit (files in .hex format) already stored in your device. Choose the file you want and press the flash button to transfer. The file is automatically transfered into the micro:bit
Once the .hex file has been downloaded, a confirmation message pops up on the screen. Once the .hex file has been downloaded, a confirmation message pops up on the screen.