The DYNAMIXEL X series is a new range of inexpensive high performance servo motors. The XL series has the same mechanical structure as the XM430 and XH430 , and it’s compatible with the latter.
These servo motors directly embark their network card which allows the communication with the other servos motors as well as with the controller. This makes it easy to connect multiple motors and communicate with each one .
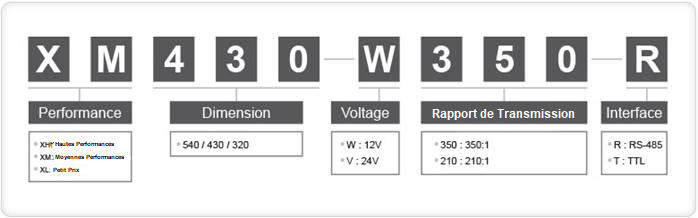
Here is a table which explains the reference number of the servomotors.
Necessary material
To use the XL430 servomotors, you will need:
- a U2D2 connector to configure the motors (it’s possible to use the OpenCM9.04 controller but a little more difficult)
- an OpenCM9.04 board mandatory completed with the OpenCM 485 expansion board *
- a 12V external power supply, such as the SPMS charger for Dynamixel, or the LBS-10 battery
*It is possible to use the OpenCR 1.0 board, instead of the OpenCM9.04 and OpenCM 485 combination (assembly not described in this tutorial).
Dynamixel motors configuration
Straight out of the factory, the motors all have the same ID: 1. If you wish to use several motors, you will need to assign to each one of them a different ID. You will have the possibility to adjust and consult numerous others parameters, but ID assignment is essential.
Assembly
For this stage, the OpenCM 9.04 board is not necessary.
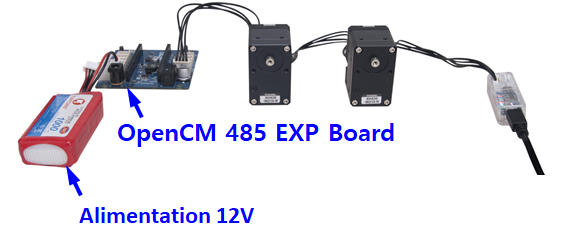
The wiring should be realised according to the pictures below, namely:
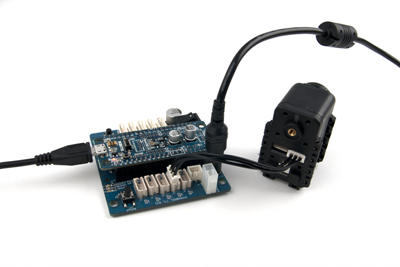
- Connect the power supply to the OpenCM 485 (on the jack plug (1) with the SMPS charger, or on the connector (3) with the LBS-10 battery)
- Connect the OpenCM 485 to the first XL430 servo with the robotics cable (convertible) supplied with the U2D2 Dynamixel connector
- Connect the XL430 servos to each other with their cables (optional)
- Connect the last servo of the string to the U2D2 connector with the cable supplied with the servo
- Connect the U2D2 connector to the computer via the USB cable supplied

Setup
Download and install the Roboplus software, proposed by Robotis.
Launch the R+ Launcher application, then the R+ Manager 2.0 which will permit to configure the motors. In the next menu, select Dynamixel X and click the center at the bottom center to confirm.
Click “Update and test”, then click “Next”. In the next stage, select the dongle port (in our example, it is the COM7) and launch the scan.
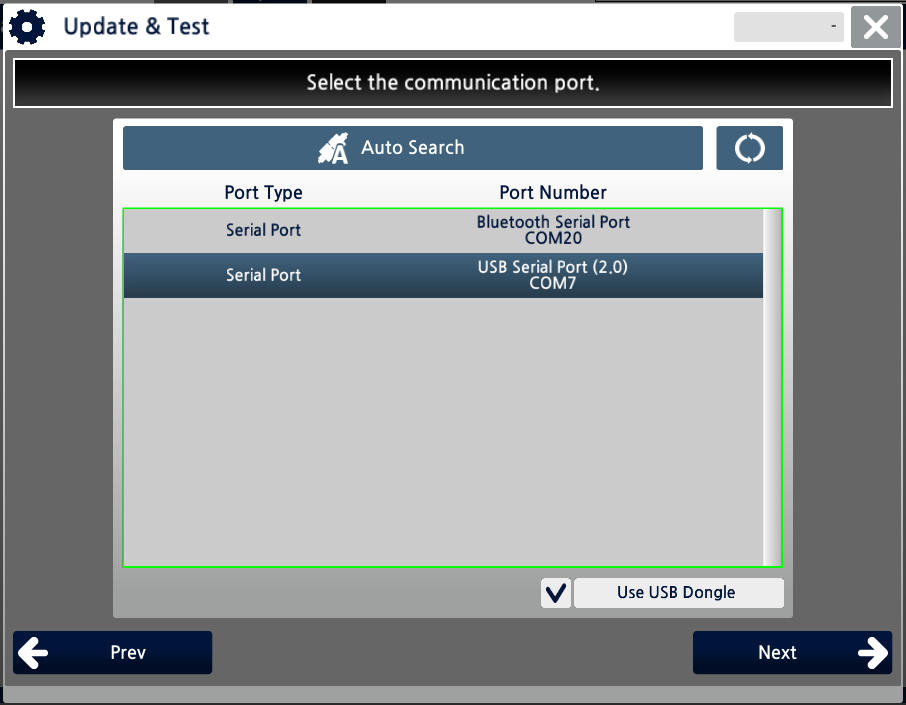
Select the baud rate (by default the motors are in 57600bps). If some motors are find, they will be displayed.
Click “Next” to access the last stage, being the motors management:
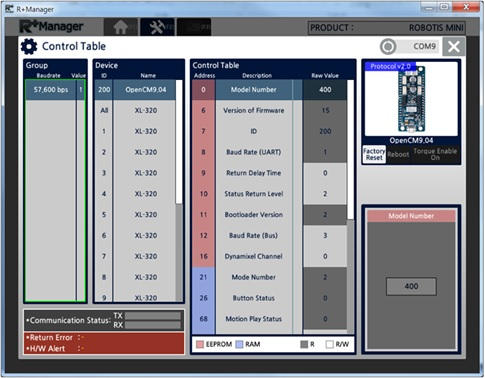
You will have to modify the box named “ID” (address 7) to modify the motor’s ID and thus avoid conflicts on the network.
Numerous other motors parameters can be consulted and modified. You can find each data on this page .
In order to learn how to use your motors, we recommend you to browse the different registers.
Programming
Assembly :
For this stage, the U2D2 connector is not necessary.
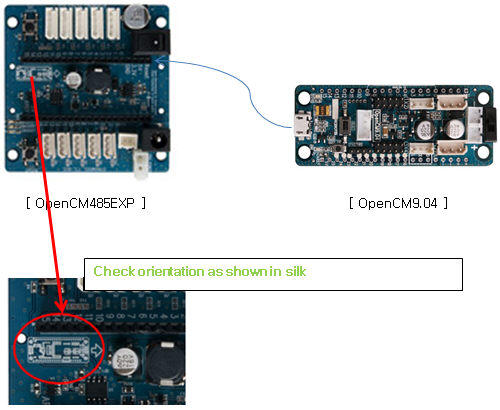
Start by welding the pins below the CM9.04 so you can connect it on the CM 485 board. You will need to pay attention to the orientation of the CM9.04 before connecting it, it’s indicated on the CM 485 .
Then, realise the following connections:
- Connect the power supply to the OpenCM 485 (on the jack plug (1) with the SMPS charger, or on the connector (3) with the LBS-10 battery )
- Connect the OpenCM 485 to the first XL430 servo with the robotics cable (convertible) supplied with the U2D2 Dynamixel connector
- Connect the XL430 servos to each other with their cables (optional)
- Connect the last servo of the string to the U2D2 connector with the cable supplied with the servo
- Connect the OpenCM 9.04 board to the computer via the USB cable supplied
Programming with Arduino
If it is your first time programming Dynamixel servomotors with Arduino , you will need to download the Arduino IDE and add the OpenCM9.04 in the board manager, following the procedure described in this page (go to the ” 8.3.1.5-Porting the OpenCM9.04 board to Arduino IDE” section).
To ensure the good installation of the software and hardware, you can use this code to switch the LEDs of the OpenCM 485 board on . Once the software uploaded, click one of the buttons of the OpenCM 485 to switch the LEDs on.
Sometimes you may not be able to upload the program. In this case, switch off the electrical circuit and reconnect the power supply while pushing the user button of the OpenCM9.04 board.
As mentioned previously, the consultation of the registers and functions during the configuration phase will allow to know the various possible actions on the motors (temperature recovery, position, speed, give a position, or a speed, etc..)
This example code is used to move a servomotor from a position “A” to a position “B” . If this code does not work, remember to check that the ID in the code is the same as the one of your motor.
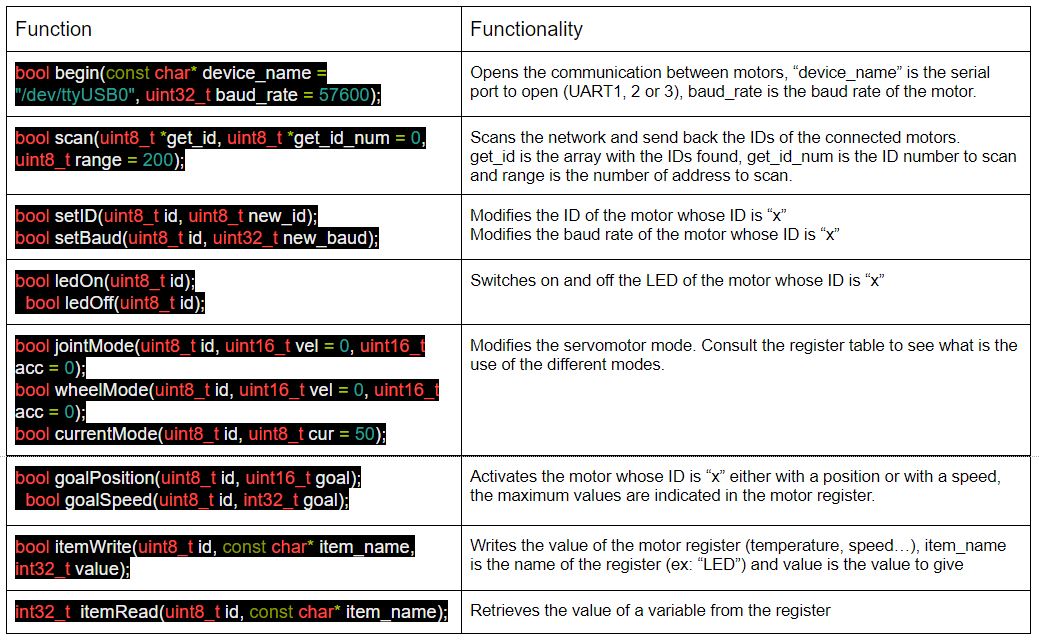
We use the library “ DynamixelWorkbench.h ” which was installed during the stage of adding the board to the Arduino environment. Here is a table of the basic functions, to have all the functions you can refer to this library .
Additional resources:
- Complete documentation on the OpenCM 485 board
- Complete documentation on the OpenCM9.04
- Complete documentation on the XL 430 servos